Feta Everyone loves my Fias Co Farm Feta Cheese.
The following are detailed instructions on how I make my homemade Feta. Ingredients: 2-3 gallons goat milk (or cow milk) – (I use a little over 3 gallons of raw, unpasteurized goat milk) 1/4 – 1/2 tsp. Kid or Kid/Lamb Lipase powder (this is not vegetarian- you can omit if you wish, but the cheese will not have as much flavor) – (I use Kid/Lamb Lipase because I like a strong flavor) 1 tsp. Liquid rennet dissolved in 1/2 C. water – (NOTE: I use 1/2 tsp. double strength vegetable rennet) Kosher salt Brine: 1/2 C. salt (Kosher, of course) per 1/2 gallon of water (boiled and cooled to below room temp.)
*The DVI cultures I use are purchased from The Dairy Connection. Of course you should sterilize all your equipment before you begin. In a "double boiler" pot set up, warm the milk to 86° (88° for cow milk) (In the summer when my kitchen is hot, I can bypass using the double boiler to keep the milk at the correct temperature). Add the culture and lipase. You should be able to substitute live cultured buttermilk if you wish, though I have never tried this recipe using buttermilk. You definitely want to use the lipase in this cheese. Lipase is the enzyme that gives Feta that great Feta flavor. Stir well and let ripen, covered, for one hour. | 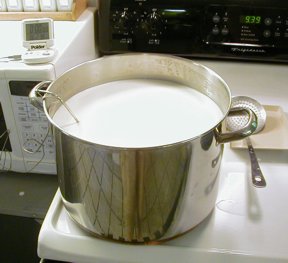 A little more than three gallons of milk ready to start it's transformation to delicious Feta Cheese A little more than three gallons of milk ready to start it's transformation to delicious Feta Cheese | | Keeping the milk at 86° (88° for cow milk). Add the rennet and stir briskly for 15 seconds. I then kind of "stop" the milk from moving with my ladle. Cover and let set about 30-40 minutes, or until you get a "clean break". | 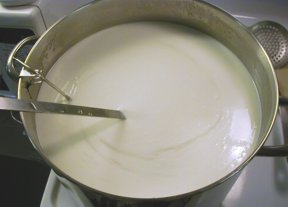 After the rennet has been added and the milk has set for 30 minutes, stick the knife in at an angle to get ready to test for a "clean break" After the rennet has been added and the milk has set for 30 minutes, stick the knife in at an angle to get ready to test for a "clean break" | | You can check for a clean break by sticking your knife, or thermometer, into the curd at an angle. Pull straight up out of the curd; if the curd breaks cleanly around the knife and whey runs into the crack that is made; you have a "clean break." Once you see this for the first time, you will know just what I mean. | 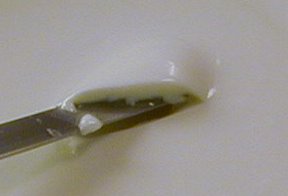 Pull the knife straight up and the curd breaks cleanly around it. Pull the knife straight up and the curd breaks cleanly around it. | Cut the curd into 1/2" pieces. Cutting the curds can be the most confusing part, but just don't worry so much. Use a long knife held vertically and cut 1/2" slices in the curds. Then turn the pot 90° and cut across in 1/2" slices the other direction, making a kind of checkerboard pattern. Now hold the knife at a sideways 45° angle and retrace your cuts. Turn the pot 1/4 turn and retrace the cuts. Turn it again and cut and then one final turn and cut. By the last turn you probably won't be able to see the original cuts, but just do the best you can. If you don't think you cut the curd perfectly, don't worry. <Video of curd cutting coming soon.> Do not stir yet. |  Cutting the curd Cutting the curd | Let the curds rest for 10 minutes (5 minutes for cow milk). After this rest period, stir the curd gently and cut any pieces that you missed when you first cut the curd (don't worry about being too perfect). Hold the curd at 86° for 45 minutes (88° for cow milk), carefully stirring occasionally to prevent the curd from sticking together (I stir every 10 minutes). This process of "cooking" the curd helps the curd "toughen up" as well as release it's whey. 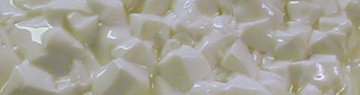
Close up of freshly cut curd.
The first cut curd is very soft and delicate.
| 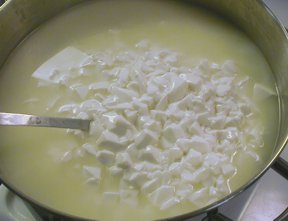 Stirring the cut curd after it has sat for 10 minutes Stirring the cut curd after it has sat for 10 minutes | 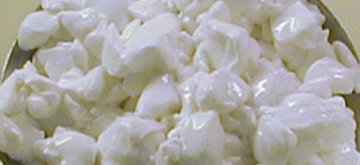 Close up of curd after 45 minutes. Close up of curd after 45 minutes.
It has toughened up a bit and released quite a bit of it's whey.
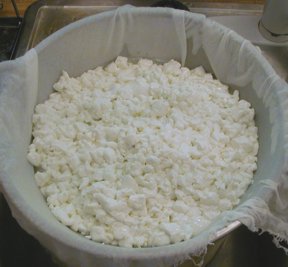
It is now ready to pour into cheesecloth | 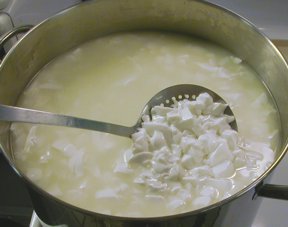 Stirring the curd during the "cooking" process so it does not stick together Stirring the curd during the "cooking" process so it does not stick together | Place a big colander over a big pot and line the colander with a large piece of dampened cheesecloth. I use fine cheesecloth. if you dampen it, it will stick slightly to the colander, holding it in place. Carefully pour the curd into the colander. | | Tie the corners of the cheesecloth together and hang the bag to drain. Be sure to save the whey to make some Ricotta later.After 3-4 hours, take the cheese down and turn the cheese over in the cheesecloth (top turned to bottom). At this point I actually switch to a different piece of slightly "courser" (medium weave; a little more open weave) cheesecloth. You don't have to feel you have to change to a new cloth if you don't want to. This turning will "even up" the cheese into a nice form. If you don't turn it, you will have a rough, "stalagmitish" side to the cheese; it is edible, just not so attractive. 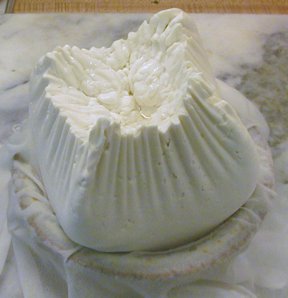
Feta after hanging for a few hours; ready to turn over in the cheesecloth.
| |
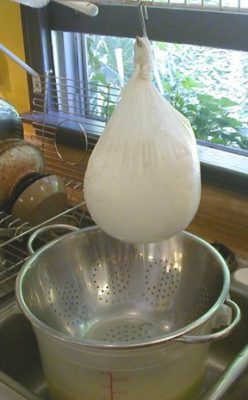
Let your cheese hang and continue draining for about 24 hours, at this point it will start to develop a distinctive odor. Make sure to warn your family that you are making cheese or they may start looking around for what the heck that smell is. I had some cheese hanging once and Larry said to me, "Did Purknz (our cat) vomit or something?" "No," I replied, "it's just the cheese." "Oh," he said, "then that's OK, as long as I know what it is. If it's a cheese, it smells good. If it's not cheese, we have a problem." 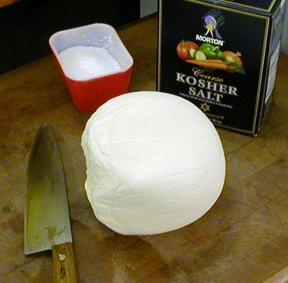 The Feta cheese, after hanging for 24 hours, The Feta cheese, after hanging for 24 hours,
is ready to cut. | 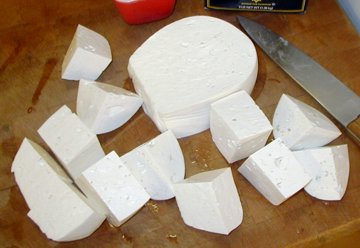
The cheese is smaller than it was when it was first hung to drain.
Yes, this is the same cheese from all the photos above, that has been made using over 3 gallons of milk. |
After your cheese has hung for about 24 hours or so, remove it from the cloth and cut it into usable size cubes/blocks (about 2-3 inches). Sprinkle all the sides of the cubes with kosher salt and place them in a sterilized, large, sealable, container. Cover and let sit at room temperature for 2-3 days to "harden up" the blocks. The blocks will continue to release whey during this time; that is normal. Transfer the blocks (and their whey if you wish) to a large sterilized glass container (I like to use a really big, gallon pickle jar). Add the brine. I have found that if I add the brine too soon, the cheese sometimes starts softening up. If this starts happening to you, pour off the brine, it will only get worse. The cheese is still good; you may just want to use it in cooking instead of for crumbling. |  I found the prefect thing to age my feta blocks in is a I found the prefect thing to age my feta blocks in is a
33 Cup Rubbermaid food storage container with lid. |
Age for at least 1-4 weeks before use (to develop flavor). I age at least a month. Your Feta cheese will keep in its brine (refrigerated) for a very, very long time (up to a year), and will only keep getting better (stronger). On occasion, you may find some mold forming on top of the brine. When this happens, just skim it off, the cheese is still fine. If a piece of the cheese was sticking above the brine, it may mold. Just remove it and feed it to the dog, the rest of the cheese is still good. You should always be aware that it takes a lot of milk to make a little cheese. I make my cheese in batches determined by how much milk my big pot will comfortably hold, which is a little over three gallons of milk, and get about 3 pounds of finished cheese per batch. How much cheese you get will vary depending on many factors: type of milk used; fat content of milk; stage of lactation of the animal that produced the milk; your style of cheesemaking (handling of curds, temperatures during cheesemaking, hang time, etc). |  Feta being aged in a gallon pickle jar. I use a plastic sandwich bag under the lid to make a nice seal and keep the pickly lid smell from infecting the cheese and visa versa. Feta being aged in a gallon pickle jar. I use a plastic sandwich bag under the lid to make a nice seal and keep the pickly lid smell from infecting the cheese and visa versa. |
Hopah!!!
Feta Cheese Troubleshooter: The cheese gets soft in the brine: Sometimes you may have problems with the cheese softening in the brine. This is most probably the caused by the fact that you did not hang the curd long enough. The hanging of the curd is developing the acidity of the cheese. This acidity is what helps the curd "stand up" to the brine and not get soft. If you are uncomfortable hanging the cheese for such a long period, you may want to try this other method. After hanging the curds for about 6-8 hours, take it down and cut it into large cubes, salt the cubes lightly (this protects it from being contaminated by molds) and place them in a clean glass container of some sort. Cover this container and let it sit on the counter for a couple days. You need to do this outside the fridge, because the acidity will not develop correctly at a low temp. If you don't get the high acidity, the cheese will soften in the brine. If the cheese still softens, increase the amount of time the cheese stands before placed in the brine. Softening could also be caused by the brine pulling calcium out of the cheese. To prevent this, you can add someCalcium chloride to the brine.
|